How to Design a Board Game

By GABE BARRETT

It’s time to get that game out of your head and onto a table.

I’m so glad you’ve decided to design a board game! It takes a ton of effort, but with a little creativity and some good old fashioned hard work, I know you can bring your game to life. And I hope this post (and website) will be a helpful guide as you work your way down the design path.

The main thing to remember is that there aren’t any shortcuts. Like any other creative endeavor, designing board games takes time, effort, making and learning from mistakes, consistency, honest feedback, and all the other things that go into bringing creativity to life. 

So, let’s dive into the key concepts.

Table of Contents

“You develop taste before you develop skill. In other words, you’ll know what’s good long before you can make what’s good. Just keep going.”

— Matt Colville

What Is a Board Game?

To put it simply, a board game is a fun engine. Players put time into it and get fun out. So, as a designer, you want to maximize the time to fun ratio. Now, that’s obviously easier said than done, but hopefully this booklet will help you start figuring out what it takes to create a fun engine that keeps players coming back time and time again.

Why Designing Games Is Important

Board games are different from other forms of entertainment because they’re about a lot more than just sitting and absorbing content. Instead, games give players an active role in determining how the experience is going to play out. They give people the opportunity to not only enjoy a story but also to have an impact on how that story gets told.

That means game designers are storytellers to the highest degree because what we’re really creating is opportunities for others to tell great stories. We bring people together around a table to experience something that will hopefully build relationships and create lasting memories.

So, if you ever find yourself asking, “Does this even matter?” the answer is YES! All artistic expressions come with their fair share of tough days, and designing board games is no different. But in those moments, just remind yourself that games matter, and they have the ability to improve people’s lives.

Where to Start

The first stage of game design can be the most exciting but also the most challenging. Usually, something will spark an idea and make you think, “That would be a cool game!” But then what? Turning an idea into a playable game can seem like a monumental task, and it’s often so overwhelming to think about that many people just leave the ideas in their heads.

So, the best thing you can do is simply start getting ideas out of your head. Write down everything that comes to mind. Write down bad ideas that you’ll erase later. Write down placeholder ideas to bridge the gap from one thought to another.

Don’t hold anything back, and don’t worry so much about organization or critiquing your ideas. There will be plenty of time for that later. Just get as many thoughts out as possible. Once they’re out, you can start figuring out everything else. And remember that most great writers are actually great re-writers, and in the same way, most great game designers are actually great re-designers.

Theme vs Mechanisms vs Experience

There’s an age-old debate about the best place to start when creating a game. Some designers start with theme; others start with a core mechanism; and more recently, some designers start with a specific experience in mind. Honestly, there’s no wrong answer, and all three methods have led to games considered to be the “best of all time.”

Just go with the method that works best for you. Typically, it’s more about the way your brain approaches the world anyway, so don’t get caught up on the frivolous debate.

And if you’re having a hard time figuring out which mechanism(s) to use in your game, you can find a massive list HERE.

Where to Put Ideas

Every designer has their preferred place to put and store ideas. Some people go all digital with things like Evernote, Google Docs, or OneNote. This makes storing, editing, and moving ideas really easy.

Other designers opt for a physical method and use things like a bullet journal, notebook, or color-coded binder. This works well for people who like to be able to write and draw easily on the same page, and it can help you avoid the distractions from a digital device.

Personally, I write everything down on notecards and use recipe organizer pages inside a three-ring binder to keep track of everything. This makes it easy to move and change ideas, and I always keep a few notecards in my pocket, so I can write down ideas immediately when they pop up.

There’s really no wrong answer. Just figure out a system that works for you and go with it. The main thing is to get the ideas out.

Find the Fun

As soon as you have an idea for a game, go ahead and start thinking through where the actual fun will be. In other words, start defining the player experience. An abstract puzzle game is going to provide a very different experience than a character-driven adventure game. Even if those games have a similar theme, their “fun” is going to be found in very different places.

I find it helpful to answer a handful of basic questions as I begin a new design:

  1. Who is the game for? Defining your target audience is going to help you make lots of design decisions.
  2. How should the players feel? Do you want them to feel heroic, thoughtful, paranoid, etc? This will help you figure out other aspects of the game.
  3. What makes this game different? Why would people want to play this game over other games on the market? What sets it apart? It doesn’t have to be groundbreaking, but it shouldn’t just be a clone of something else.
  4. What are some possible mechanisms that line up with the desired player experience? A great game feels like everything fits together.
  5. What are players trying to accomplish, and how do they win? Defining what you want players to do in the game and how they’re going to win will make a lot of other decisions easier down the road.
  6. What player count, play time, and age range should the game have? Defining these basic elements can give you a helpful box to keep your game inside. If the game is supposed to be a quick-playing, hour-long sci-fi game, you’ll likely have a different combat system than if the game is supposed to be a two-hour epic space opera.

There are plenty of other questions you can ask yourself, but the main thing is to be very intentional about where the fun in your game can be found. When you define that properly, it’s much easier to cut any aspects of your game that steer away from the fun.

Play Lots of Games

One of the best things you can do to learn and grow as a designer is play LOTS of other games. If you want to become a great writer, read every book you can get your hands on. If you want to become a great game designer, play as many games as you can.

Play the greatest games of all time. Play games no one has ever heard of. Play other designers’ prototypes. Play games that you love. Play games that you hate. Play games in genres you’re not even interested in.

Playing lots of different games will give you ideas for your own designs. You’ll learn how designers solved certain problems and handled different situations. And playing newer games will show you what’s popular in the current market.

For some great lists of games to play, go HERE.

Minimum Viable Product

When you start a design, it’s easy to overthink things and bite off way more than you can chew. When I was just starting out, I packed journals full of cool ideas that grew out of control until I felt so overwhelmed by their magnitude that I moved on to something else. It wasn’t until I learned how to create a minimum viable product that my ideas started to actually become prototypes.

A minimum viable product (or MVP) is the smallest, simplest version of your idea. If you want to create a massive space game with lots of ship-to-ship combat, the MVP might be the simple dice-rolling combat mechanism. If you want to create a Euro-style game about farming, the MVP might be the resource collection mechanism.

Focusing on a small aspect of a game’s overall design makes it way easier to get things done, and you can start figuring out if the game is fun or not long before you put a bunch of time into it. And creating one part of the game can give you momentum to finish others.

Typically, I design different parts of a game as individual modules. First, I might create the movement system. Then, I’ll work on the combat system. After that, I’ll put together the resource management system. I’ll playtest each system individually to see what works and what doesn’t, but the main priority is to create now and edit later. And once I have several systems in place, I’ll start combining them so that they work together.

It’s not a perfect way to do things, but it might work for you. I find that it saves a ton of time, and it gives me small victories that energize me to work on the next aspect of the game.

But no matter what system works for you, the main thing is to get something on the table. You can’t playtest an idea, so work to make something that you can actually play around with to see if it’s a game worth pursuing.

How to Get Unstuck

Designer’s block is very real and very frustrating, but it’s just part of the process. I hope you never deal with it, but chances are good that it’s going to hit you rather often. You’ll be working on a game, and everything will be fitting together nicely when all of a sudden an obstacle comes up that you have no idea how to solve.

It’s typical, so don’t get overly frustrated. Some of the best games ever created got stuck for years before the designer figured out an answer to a certain issue.

When you get stuck, I recommend putting the design on hold and letting your brain rest for a bit. This is a great time to play other games, and the answer to your problem might be found in seeing how another designer handled a similar situation.

This is also a great time to work on a totally different game. I’m constantly figuring out ways to fix one game while working on a completely different project. Sometimes the brain just needs to be slightly distracted to work its way through a challenge.

And, honestly, sometimes you get stuck on something that you just aren’t a good enough designer yet to solve. Like all other artforms, game design takes time, practice, and dedication if you want to get good at it. And you’ll be able to identify a good game long before you’ll be able to create a good game. Just keep going.

Most people never become great at something because they quit long before they’ve spent enough time to earn greatness. The greatest writers, artists, designers, etc. only got to that point because they created a bunch of art that ended up in the trash, and they kept going. I encourage you to do the same.

“Ever tried. Ever failed. No matter. Try again. Fail again. Fail better.”

Samuel Beckett

Get Your Ideas Out there

There’s a common misconception among new designers that they shouldn’t talk about their ideas or game designs online because someone might steal them. Well, the truth is that this is just completely untrue.

The truth is that there’s not a ton of money in designing games, and the industry is rather small. In other words, if a designer or company steals your game, it will likely cost them more money than they would make as they would get blacklisted from major circles and have a hard time finding people to work with them in the future.

Plus, all the designers I know are working on 10+ designs of their own, and they’re way more excited about their games than about yours.

So, get out there and discuss your ideas. The Board Game Design Lab Facebook Community is an amazing place to start. (Also, posting publicly about your game makes it even harder to steal because it creates a public record that you can point to.)

Great games don’t get made in a vacuum. You’ll need other people to take a look at your game and offer feedback. This mainly comes through playtesting, but just having some other designers to bounce ideas off of is invaluable and will drastically improve your game’s development.

Also, I’ve known quite a few people who posted about their game online seeking feedback and ended up getting a publishing deal with a company that happened to see the post.

“You miss 100% of the shots you don’t take.”

Wayne Gretzky

71 Ways to Become a Better Game Designer

If you want to level up your game design skills, check out this massive PDF, and join the Board Game Design Lab email list.
Level UP

Prototyping

Ok, so you’ve got a game on your mind, and you’ve jotted down lots of notes on how it could work. Now, it’s time to actually create something for real. You still want to follow the minimum viable product concepts from the previous chapter and get at least part of the game to the table as soon as possible.

Now, this section isn’t going to cover every corner of prototyping a game, but it will hopefully provide you with lots of tips and tricks on how to improve your prototyping process.

Cards

Most games have cards, so having a quick system to create them will drastically speed up your prototyping process. For the best results, I recommend downloading some card templates found at the URL on the back cover of this book. Then, upload the file to your favorite image editor (I use Canva).

Now that you’ve got a foundation, you can add any images, icons, and text that need to go on the cards. And with those templates, you’ll know exactly how much space you have to work with. Then, print the cards, and cut them out along the designated cut lines.

To give them some weight and make them easier to handle and shuffle, slide the card into a card sleeve along with a playing card. I buy playing cards in bulk from the dollar store, but you can also use Magic cards or anything that fits well in the sleeves.

Sleeves

Another great thing about sleeves is that you can write on them and change information as you go. Let’s say you’re not sure if a card should have a 1 or a 2 in its top-left corner. Simply leave that area blank when you design the card, and once it’s in a card sleeve, write the number with a permanent marker.

If you write a 1 and decide to change it to a 2, all you have to do is color over the permanent marker with a dry-erase marker, and then wipe it off. Everything will wipe right off, and now you can write the new number.

Also, sleeves are available in nearly every color you can imagine which opens up tons of options for different card backs without having to design or print anything.

Boards

Game boards can be challenging to make, but it’s often because designers overthink things and try to make them look too good when the game is still in the early stages of design. There’s no sense putting a lot of time into something that’s going to change a bunch, so here are my favorite options for board creation.

  1. Graph paper. Before I make a board, I’ll plan it out on graph paper to see how everything fits together and needs to be spaced out. You can easily find different graph sizes and shapes through a Google search if you want to do something more advanced than the typical page full of blue squares. Hexes are notoriously hard to draw, so hex graph paper is a must-have.
    Then, for the first playtest or two, I’ll usually use this rough outline of a board to see if it actually works. And if you draw everything in pencil, you can easily change things on the fly.

  2. Whiteboard. A whiteboard is great when you want something bigger than graph paper, but lots of things are still subject to change. For aspects you’re more sure of, you can draw/write with wet-erase markers so they’ll be more lasting. And for things you’re less sure of, you can use dry-erase markers to make changes quickly and easily.

  3. Cardstock – Once I’m more sure of how the board is going to look, I create a large image in Canva, download it, and then print it in “poster” format with Adobe so that it prints as multiple, tiled sheets. I print it on cardstock so it’s more durable, cut off any white space, and tape it all together to make the board.

Stickers

I love using stickers to make custom dice, boards, tokens, tiles, and player boards. I buy 8.5×11” sticker labels so that I can easily print out what I’m working on, cut it out, and then stick it to something more durable.

For tokens, tiles, boards, and player boards, I place the stickers onto cereal boxes or cardboard and then cut things to the size I need.

For dice, I use the template found in the digital files to place icons on in Canva. Then, I print onto the sticker label, cut out each square, and stick them onto the dice.

Tokens and Tiles

If you go to the URL on the back cover of this book, you’ll find lots of different templates to help you create tokens and tiles of different shapes and sizes. Just load the template you want to use into an image editor, add art and graphics, print it out, cut out the tokens/tiles, and adhere them to the material of your choice. I use cereal box cardboard, but shipping boxes can work well too.

Components

You can never have enough little, wooden bits in your game design toolbox. Different shapes and colors can represent all sorts of different things from workers to resources to actions to anything you can think of.

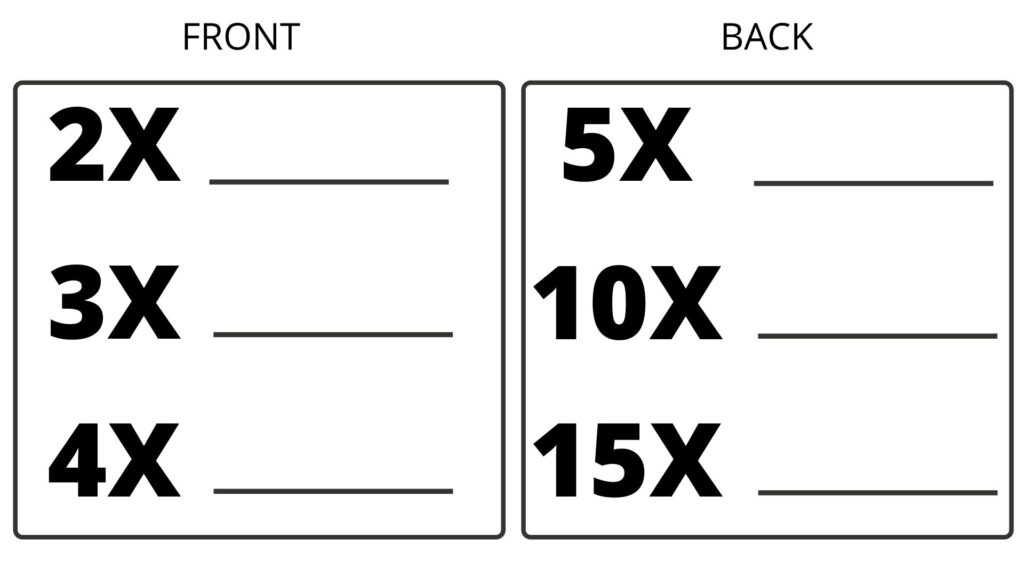
And if you find that you don’t have enough of a component, you can use small multiplier boards where you can keep track of how many things you have with only one component necessary. For example, if you only have a few yellow cubes representing wheat, you can place one cube on the 4X spot to show that you currently have four wheat resources.

Here’s what mine looks like:

Thrift stores are great places to find used board games that you can pilfer for spare parts. Craft stores are also excellent resources for finding interesting components. You might even find such a cool or unique piece that you design an entire game around it!

And if you ever want to upgrade to more “premium” bits, there are quite a few online shops that sell nearly every shape of custom component you can think of. I’m a big fan of Meeple Source.

Dice

You can use dice to represent a ton of different things in a game. Health points, damage, workers, actions, time, etc. You can roll them, place them, and stack them. They have a ton of versatility. And once you add in blank dice and stickers, you gain the ability to have custom die faces which means the sky’s the limit for what you can do.

However, if your game has custom dice, to get an idea to the table as soon as possible, I recommend creating a dice chart at first instead of taking the time to make custom icons. Simply write down what each side of the die means: a 1 is a miss; a 3 is a shield; a 6 is a hit; etc. Early on, your dice are likely to change, so creating an easily changeable chart can greatly speed up your process. Then, once things are more solidified, create custom stickers for the dice.

Art

Since the goal at first is to just get something on the table that can be tested, don’t spend too much time trying to find those “perfect” images to use in your game. Either draw something basic that gets the point across or pull something off Google that works well enough to get the job done. It’s all placeholder at this point, and since it’s likely to change (or end up in the trash), it’s not worth spending too much time on.

When I first got started, I spent countless hours seeking out just the right illustrations and icons for my designs. At the time, it felt like I was working on my games, but the truth is that I was just wasting time. If a car is stuck in the mud, its tires can move 100 miles an hour while it doesn’t go anywhere. Don’t mistake movement for progress.

As long as the image gets the point across, go with it. And since you’re not trying to sell the prototype and everything is a placeholder, you don’t have to worry about copyright infringement. However, there are also quite a few online resources where you can find millions of images in the public domain that are free to use even commercially.

For some super helpful art resources and links to free images, go HERE.

Graphic Design

For a prototype, functional is way more important than beautiful. So, don’t overthink the layout of your cards, the icons you’re using, the font, etc. You can update and fix all of those things later. Put what’s necessary, and lay everything out as best you can, but don’t get bogged down with it.

You want everything to be clear enough so that playtesters can play the game effectively, but don’t worry too much beyond that at first. Look at published games that are similar to yours and borrow ideas on how they laid out their graphic design. Then, through testing, get feedback on ways you can change and improve it.

Boxes

Game boxes are definitely one of the most difficult things to create yourself. They’re not totally necessary, but they definitely make your prototype look more “professional.”

Craft stores like Michael’s and Hobby Lobby sell blank boxes that work well for hauling around prototypes.

And if you want to make your own boxes, here’s a website with a TON of templates: templatemaker.nl. And here’s a great tutorial with links to templates and step-by-step instructions.

Also, if you want to take your box’s organization to the next level, I recommend you check out Sand Box Gaming. They have some excellent wooden organizers that are perfect for game design projects.

“Professional” Prototypes

When you get to the point where you want your prototype to look more like a manufactured game, you can go through a print-on-demand service to create any and all aspects of your game. For a list of great options, go HERE.

“Always make the prototype. Otherwise, it remains nowhere near finished.”
— Rob Daviau

Conclusion

This post will hopefully get you started down the path of designing great games that people love. Creating a game can be a long road, but it’s something you can make happen if you’re willing to put in the time and effort required.

So, start getting those ideas out of your head and onto a table!

More Resources

For more reading on the topics covered here, be sure to check out the links below. 

Getting Started in Game Design

Prototyping

Playtesting

Mechanisms

Theme

Want to level up your game design skills?

Join over 6,000 other designers in the quest to create great games people love.